文章目录
Duilib实现窗口探测器
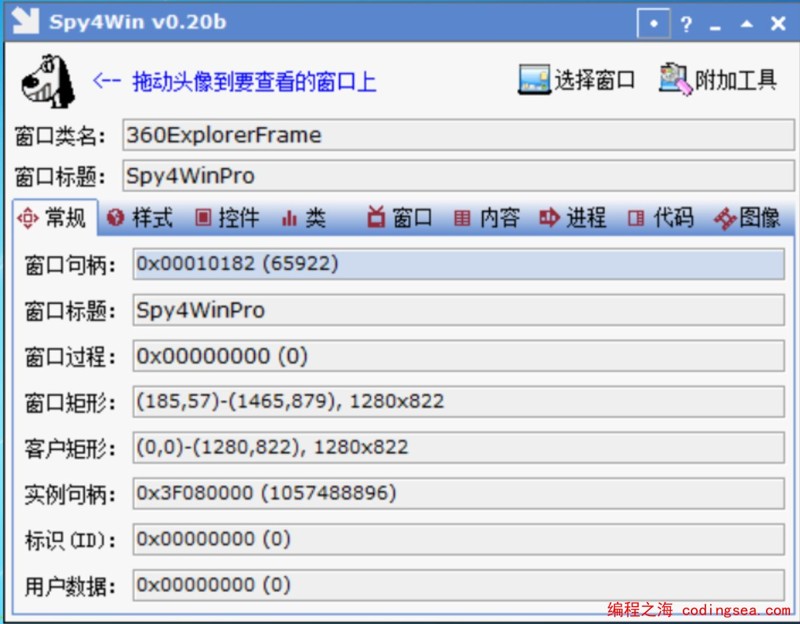
作为windows程序员,应该都用过Spy4Win这个窗口探测器,如下图所示:

然而,作者很久未更新了,从win10开始,一些功能不太正常,我在win11直接打不开,所以决定基于Duilib重新实现一个类似的软件,并将它开源。
我不会完全照搬原来的功能,计划先实现一些最常用的,并在使用过程中陆续补充新功能。
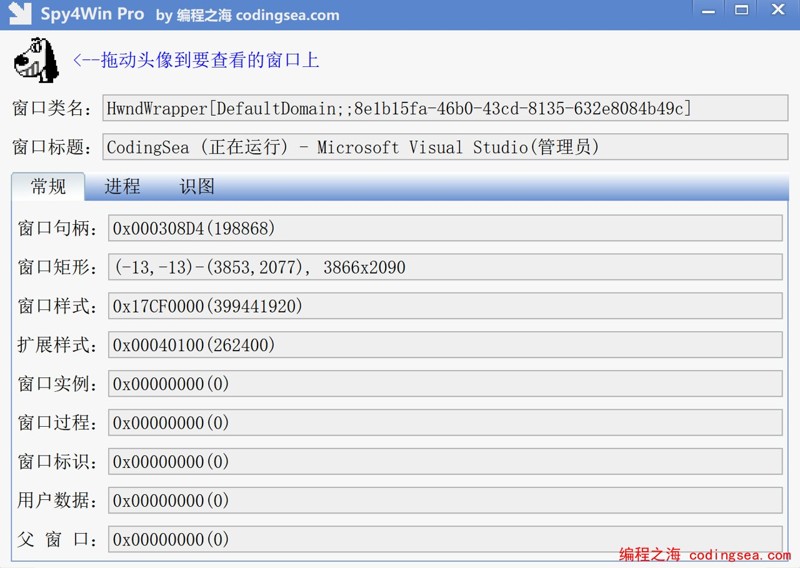
目前实现了第一页的常规属性查看。本人对游戏自动化方向比较感兴趣,后续计划优先实现进程查看、注入,以及窗口图像AI识别等方向的功能。

源码:https://gitee.com/ferrisyu/CodingSea/tree/master/Spy4WinPro
二进制下载:https://gitee.com/ferrisyu/CodingSea/releases/tag/v0.1
下面介绍一下窗口探测的基本实现。
1. 支持鼠标将小狗图标拖到桌面任意位置
主要步骤:
准备2个小狗的图片资源:dog.png dog.cur 准备1个空白且完全透明的图片资源:null.png 小狗的位置是一个按钮,normal和hover状态显示dog.png 当鼠标在按钮上左键按下时,即pushed状态,显示null.png,这样小狗就消失了。 此时,将鼠标设置成dog.cur,看上去就像小狗图标被鼠标拖走了。 当鼠标左键松开时,将鼠标设置为原先的指针,同时,按钮因为变成了normal状态,又显示小狗了。
上面看上去步骤很多,其实duilib本身就实现了按钮各个状态的图片配置,我只需要写下面这一行:
<ButtonEx name="dog" width="40" padding="12,0,12,0" tooltip="按下鼠标并拖动到相应窗口" normalimage="file='dog.png'" hotimage="file='dog.png'" pushedimage="file='null.png'" pushedcursor="102"/>
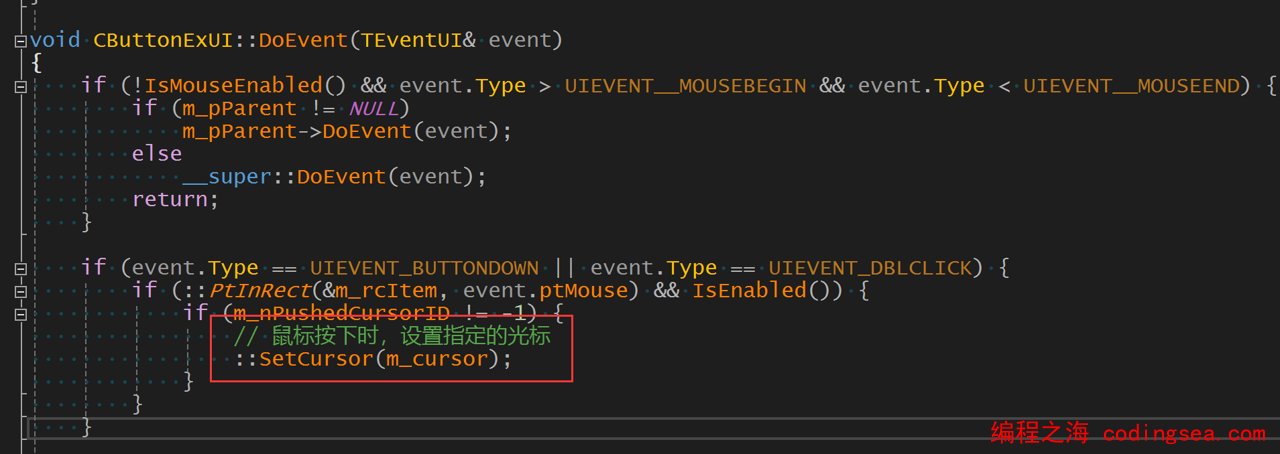
ButtonEx是我对duilib的扩展,支持对pushedcursor属性的指定,在鼠标按下时,会将鼠标设置成pushedcursor指定的cur资源。核心代码是这里:

2. 获取鼠标所在坐标的窗口句柄
关键函数GetCurRealWindow代码如下所示,代码先获取当前鼠标坐标,再调用windows api获取对应的窗口:
HWND WinApi::GetCurRealWindow()
{
    POINT ptLast;
    ::GetCursorPos(&ptLast); // 取得鼠标坐标
    return GetRealWindow(ptLast);
}

HWND WinApi::GetRealWindow(POINT ptPoint)
{
    HWND hWnd = NULL;
    HWND hWndChild = NULL;
    POINT ptCooChild = {0};
    LONG lWindowStyle = 0;
    HWND hWndTop = NULL;
    // 先得到ptPoint指向的(子)窗口
    hWndTop = ::WindowFromPoint(ptPoint);
    if (!hWndTop) {
        return NULL;
    }
    ptCooChild = ptPoint;
    lWindowStyle = GetWindowLong(hWndTop, GWL_STYLE);

    // 通过这个判断找到最上层的父窗口
    if (!GetParent(hWndTop) || GetDesktopWindow() == GetParent(hWndTop) || !(lWindowStyle & WS_CHILDWINDOW)) {
        hWnd = hWndTop;
    } else {
        hWnd = GetParent(hWndTop);
    }

    // 转换相对坐标
    ::ScreenToClient(hWnd, &ptCooChild);

    // 从父窗口一层一层往下查找子窗口,直到找到最底层的子窗口
    while (TRUE) {
        hWndChild = ChildWindowFromPointEx(hWnd, ptCooChild, CWP_SKIPINVISIBLE);
        if (!hWndChild || (hWndChild == hWnd)) {
            break;
        }

        hWnd = hWndChild;
    }

    return hWnd;
}
3. 捕获鼠标移动消息,持续调用GetCurRealWindow
void MainWnd::OnMouseMove(TNotifyUI& msg)
{
    if (!m_pm.IsCaptured()) {
        return;
    }

    HWND hWnd = WinApi::GetCurRealWindow(); // 取得鼠标指针处窗口句柄
    if (hWnd == GetHWND() || WinApi::GetClassName(hWnd) == _T("tooltips_class32")) {
        return;
    }

    if (hWnd && m_hWndCurrent != hWnd) {
        WinApi::DrawRect(m_hWndCurrent);
        ::InvalidateRect(m_hWndCurrent, NULL, TRUE);
        m_hWndCurrent = hWnd;
        WinApi::DrawRect(m_hWndCurrent);

        UpdateGeneralInfo();
    }
}
4. 根据窗口句柄查询所有属性,显示到界面
大部分属性通过GetWindowLongPtr查询。
void MainWnd::UpdateGeneralInfo()
{
    TString strClassName = WinApi::GetClassName(m_hWndCurrent);
    TString strTitle = WinApi::GetWindowText(m_hWndCurrent);
    m_editWndClass->SetText(strClassName.c_str());
    m_editWndTitle->SetText(strTitle.c_str());

    m_editWndHwnd->SetText(StringUtil::GetHexString((uint64_t)m_hWndCurrent).c_str());

    RECT rc = {0};
    ::GetWindowRect(m_hWndCurrent, &rc);
    m_editWndRect->SetText(std::format(_T("({},{})-({},{}), {}x{}"),
        rc.left, rc.top, rc.right, rc.bottom, rc.right - rc.left, rc.bottom - rc.top).c_str());

    auto styleEx = ::GetWindowLongPtr(m_hWndCurrent, GWL_EXSTYLE);
    m_editWndStyleEx->SetText(StringUtil::GetHexString(styleEx).c_str());

    auto style = ::GetWindowLongPtr(m_hWndCurrent, GWL_STYLE);
    m_editWndStyle->SetText(StringUtil::GetHexString(style).c_str());

    auto inst = ::GetWindowLongPtr(m_hWndCurrent, GWLP_HINSTANCE);
    m_editWndInst->SetText(StringUtil::GetHexString(inst).c_str());

    auto proc = ::GetWindowLongPtr(m_hWndCurrent, GWLP_WNDPROC);
    m_editWndProc->SetText(StringUtil::GetHexString(proc).c_str());

    auto id = ::GetWindowLongPtr(m_hWndCurrent, GWLP_ID);
    m_editWndId->SetText(StringUtil::GetHexString(id).c_str());

    auto userData = ::GetWindowLongPtr(m_hWndCurrent, GWLP_USERDATA);
    m_editWndUserData->SetText(StringUtil::GetHexString(userData).c_str());

    auto parent = ::GetWindowLongPtr(m_hWndCurrent, GWLP_HWNDPARENT);
    m_editWndParent->SetText(StringUtil::GetHexString(parent).c_str());
}
至此,基本实现了窗口探测的常规属性显示。
如果想要查看所有实现细节,可以到上面提到的源码链接查看或下载自行编译。因为使用了一些C++20的特性,需要使用vs2022或以上版本。有问题欢迎评论交流。
下一步准备显示窗口所在进程的信息,待更新。
编程之海 版权所有丨如未注明,均为原创丨转载请注明转自:https://codingsea.com/duilib%e5%ae%9e%e7%8e%b0%e7%aa%97%e5%8f%a3%e6%8e%a2%e6%b5%8b%e5%99%a8/


